Motorcycle road test guide
This is a practical checklist — not a riding lesson. The goal is calm confidence: know what to bring, what to check, and how to avoid the classic “I forgot ___” moment.
Preparing for your Class 6 road test in Vancouver? This guide walks you through what to expect and how to have a bike ready on test day.
BC riders: MST may come before the road test
In British Columbia, many riders need to complete a Motorcycle Skills Test (MST) before the road test. Depending on where you are in the licensing process, that can mean needing access to a motorcycle for two separate appointments — one for the MST and one for the road test.
We keep the BC explanation brief on purpose and point you to ICBC for the official rules, timelines, and booking details.
BC quick FAQ
- Do all BC riders take the same path? No. The path depends on what licence you already hold, so always confirm your exact ICBC requirements before booking.
- Why mention the MST here? Because some BC riders will need a motorcycle before the actual road test appointment.
- Should I rely on this page instead of ICBC? No. Use this page as practical guidance, then confirm the official details with ICBC.
What examiners are watching for
- Clear shoulder checks before any lane change or movement
- Full, visible stops
- Controlled speed and smooth inputs
- Proper lane positioning and intersection setup
- Observation, mirror use, and general awareness
Safe riding habits that also help on test day
- Keep a space cushion instead of crowding traffic
- Check mirrors often and scan well ahead
- Keep your head moving so your observation is obvious
- Brake progressively instead of grabbing at the last second
- Ride your own pace — calm and predictable beats rushed
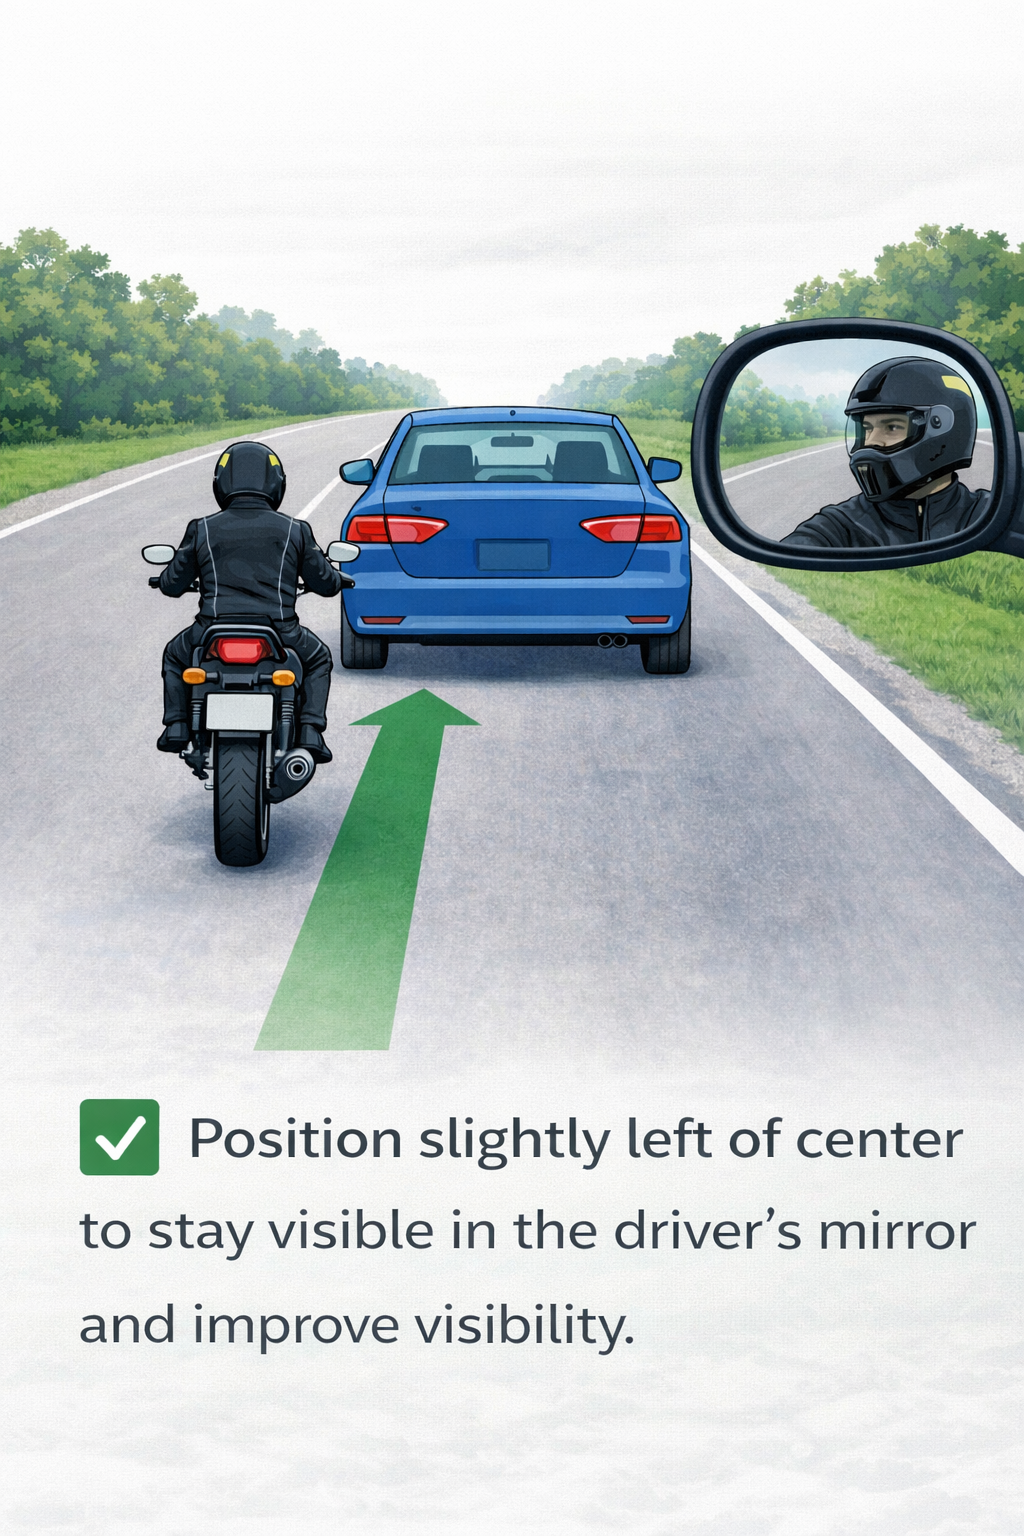
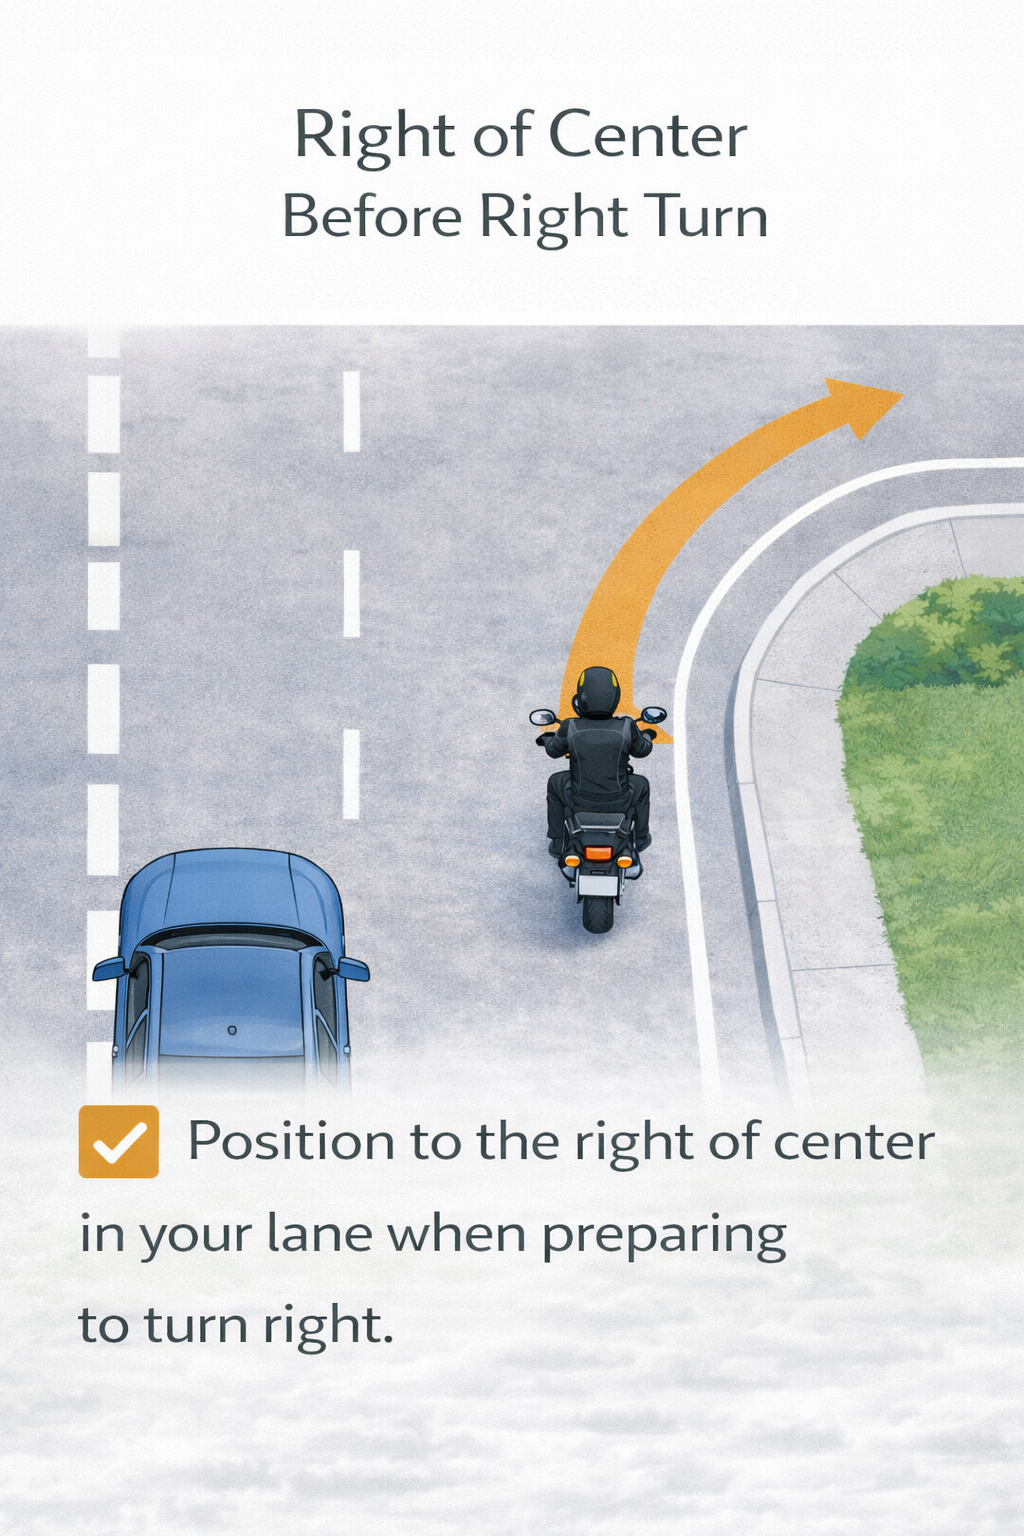
Lane position
Deliberate lane position helps with visibility, setup, and space management. On test day, do not drift around randomly — choose your track position on purpose.
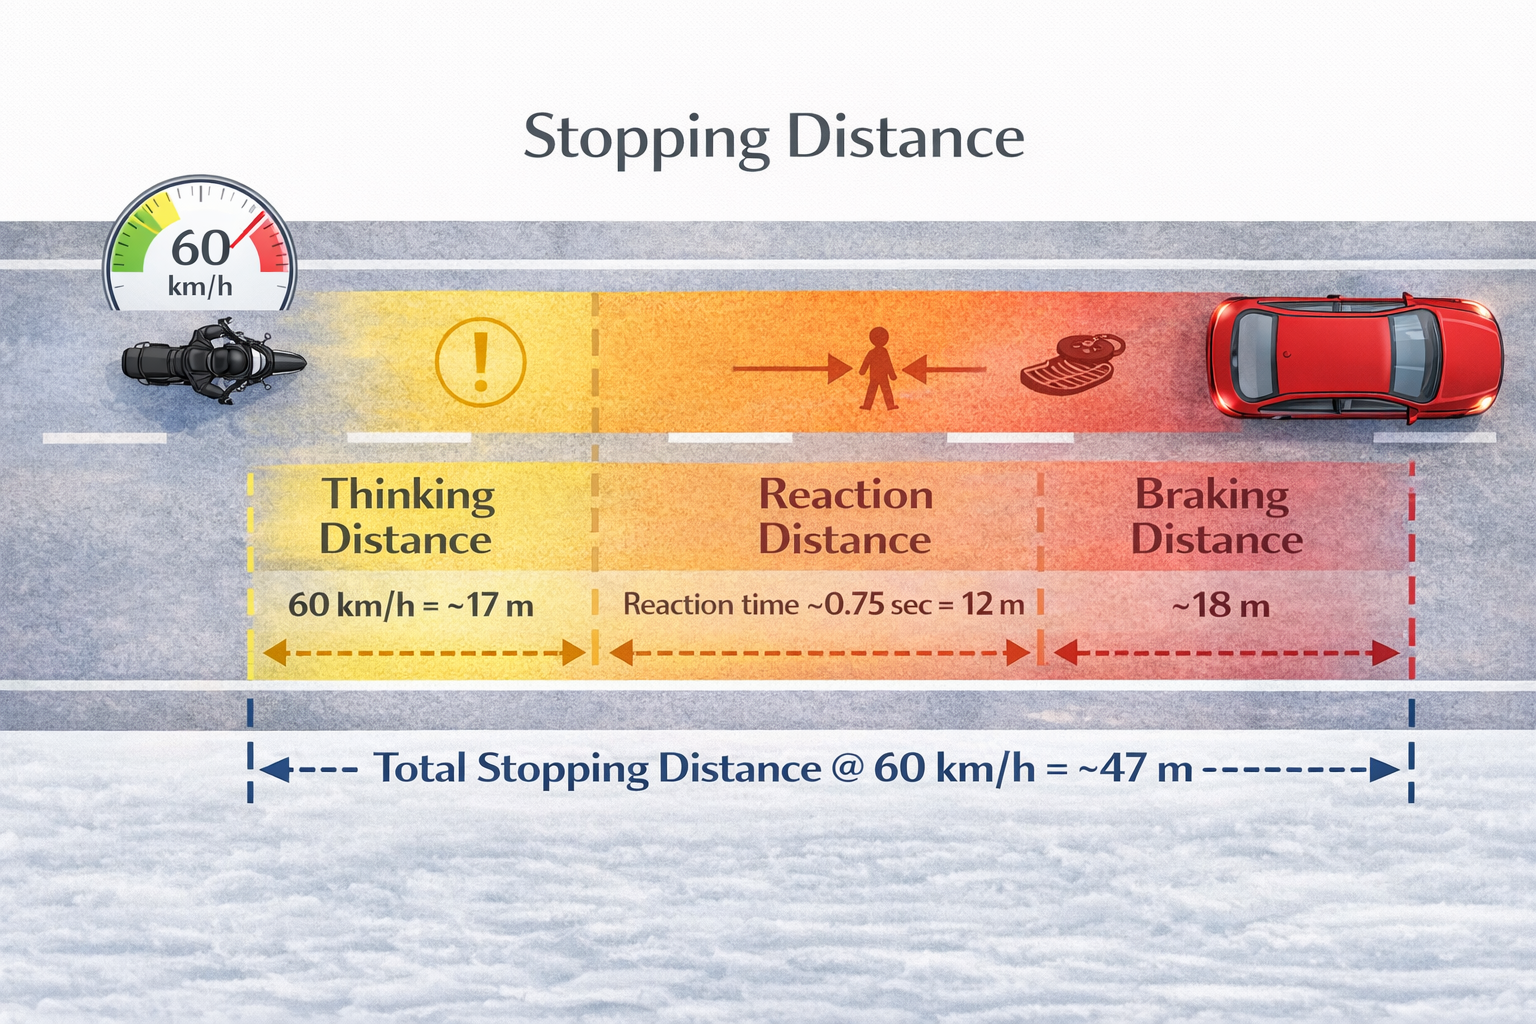
Stopping distance
Stopping distance is not just braking power. It includes reaction time, road conditions, speed, and how early you recognize what is developing ahead.
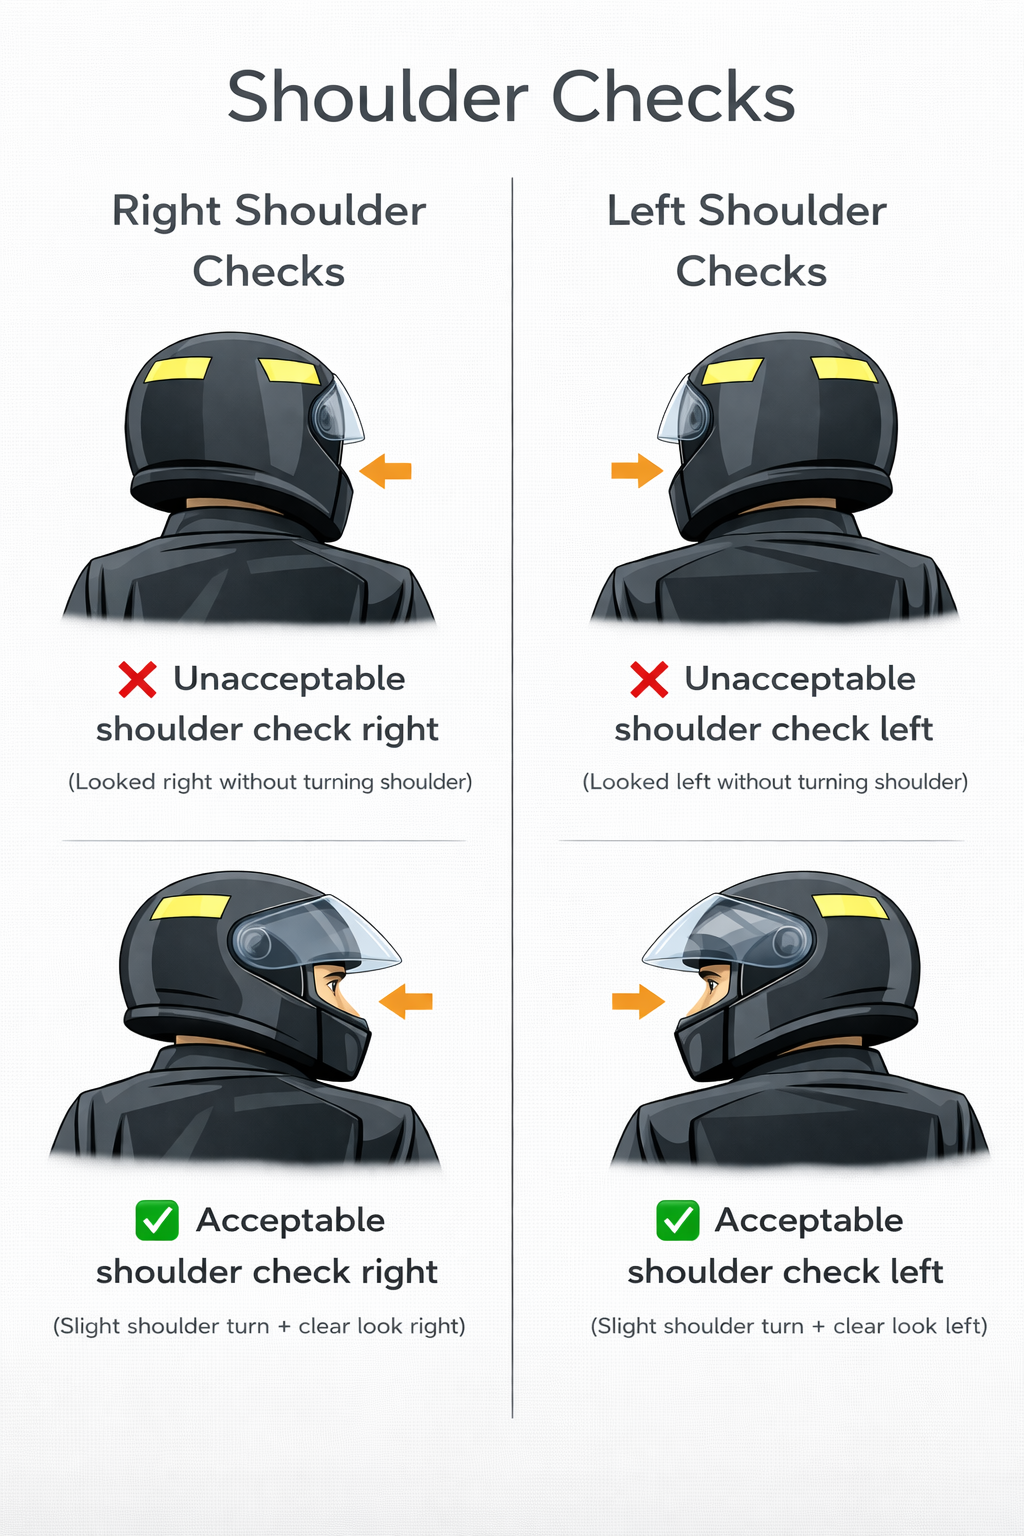
Observation / shoulder checks
Make your observation obvious. Examiners want to clearly see that you checked before changing position, moving away from the curb, or turning into traffic.
Tap-to-expand checklists
We keep the page scannable. Expand only what you need right now.
Before you book
- Confirm your road test time and location and plan to arrive 30 minutes early unless your registry says otherwise.
- Know the route area: do a calm drive-through the day before if possible.
- Bring the right documents (see checklist below).
- Practice the boring stuff: stops, signals, shoulder checks, lane position.
- Plan your warm-up: 10 minutes of slow-speed basics before the test.
Gear + documents checklist
- Helmet (approved, fits properly, visor or eye protection).
- Jacket (ideally abrasion-resistant) + gloves.
- Long pants + over-the-ankle footwear.
- License + any registry paperwork or booking confirmation.
- Weather plan: warm layer, rain layer, and a backup strategy.
Bike sanity checks (quick)
- Lights: headlight, brake light, signals.
- Horn: works.
- Tires: visibly okay, no obvious low pressure.
- Mirrors: positioned for you.
- Controls: clutch, throttle, and brakes feel normal.
Test-day flow (simple)
- Arrive early. Breathe. Don’t rush.
Rushing is the fastest way to make avoidable mistakes.
- Warm up (10 min): smooth starts and stops, turns, shoulder checks.
- During the test: scan far ahead, signal early, shoulder check before any move.
- If you make a mistake: don’t spiral. Fix the next decision.
Reset phrase: “Next move only.”
Common mistakes (and how to avoid them)
- Late signals → signal earlier than feels necessary.
- No shoulder check → make it a sequence: mirror → signal → shoulder check → move.
- Rolling stops → full stop, visibly.
- Lane position drift → pick a line and hold it deliberately.
- Nerves = stiff controls → relax grip and smooth out your throttle inputs.
If the test can’t proceed
- Unsafe weather: treat it like a reschedule, not a failure.
- Gear missing: don’t try to wing it. Fix the issue first.
- Bike not road-test ready: stop and reschedule.
Province-specific notes
- BC riders may need to complete a Motorcycle Skills Test (MST) before the road test, depending on their licensing stage.
- Use ICBC directly to confirm your exact path, timing, and booking requirements before requesting a bike.
What bikes are not suitable for a Class 6 road test?
- 50cc and under should be treated as moped territory, not a full motorcycle road-test bike.
- Automatic motorcycles may be allowed depending on province, but always confirm the local rules.
- 3-wheeled motorcycles may be allowed, but they can result in a restricted licence depending on province.
BC MST + road test FAQ
- What is the MST? It is the Motorcycle Skills Test used in BC as part of the motorcycle licensing process.
- Do I always take the MST right before the road test? Not necessarily. Check your specific ICBC path and timing before booking.
- Could I need a bike twice? Yes. Some BC riders may need one appointment for the MST and another for the road test.
- Where should I confirm the official details? Directly with ICBC using the official motorcycle licensing and booking pages linked above.
Vancouver partner spot
Local businesses relevant to riders and road-test traffic in Vancouver can appear here without cluttering the page.
BC MST walkthrough video
BC road test example video
Foot placement at stops
More Vancouver partner visibility
A lower slot can be used for a second local partner or sponsor package.